This is the original owner’s manual, written about 1972, and applicable for boats manufactured through 1978. Starting in 1979 a few changes were made in the roller furling jib and forestay arrangement. In following years, a few other changes were made, but all in all this manual should still be a useful reference for Mutineer owners of any vintage pre-1978 Mutineers. MUTINEER CLASS SAILBOAT
FOREWORD Congratulations on your choice of boat!! You have just acquired a thing of beauty – a Chrysler sailboat – which has been conceived for the express purpose of giving you many hours of carefree pleasure on the water. We have given considerable thought to the design and construction of each boat. We have gone out of our way to provide you with a quality product, second to none. A vigorous owners association is in existence, with the object of stimulating the class and keeping people who own Chrysler sailboats in touch with each other. You have a free subscription to this organization for the first year. We hope that you will continue it in the years to come.
We have written the following Rigging Instructions for your convenience, so that you should be aware of our suggested way of putting the boat together. RIGGING INSTRUCTIONS
Let’s assume that you have your boat on a trailer when you take delivery from your dealer. Start off by taking the mast and boom package off the boat and the two packages out of the boat and lay them along side of the boat. Then you will need a small selection of tools to put the boat together. It’s suggested you have: - A 7/16 inch closed end wrench (a crescent wrench will do the same job)
- A Phillips screwdriver
- A pair of pliers
- An ordinary screwdriver or even a dime will do
THE RUDDER PACKAGE
In this package, you will find two shrouds and one forestay (the forestay is the coil which is the most flexible stainless steel wire). You will also find two hose clamps, one ordinary shackle, two shroud adjuster plates and three clevis pins (one of these clevis pins is one inch in length and the other two are one half inch). Lastly, you should have a cotter pin for each of the clevis pins. REFER TO MISCELLANEOUS FITTINGS DETAIL AT RIGHT. MAST PACKAGE
This consists of the mast, boom, and the roller reefing gear, which in turn consists of an aluminum tube inside a plastic tube. SAILBAG PACKAGE
Undo the sailbag package and lay out the parts that are enclosed.
1. A large coil of rope which is the mainsheet. (3/8″)
2. The second largest coil of rope which is the jibsheet. (3/8″)
3. The longest length of 3/16″ line which is the main halyard.
4. Two short lengths of 3/16″ line, one is the tack down haul, and the other is the clew out haul.
5. The jib sail.
6. The main sail.
 The pivoting centerboard is already fitted to the boat. Should you need to take it out, first check the detail arrangement the drawing REFER TO DETAIL 12. This will show you the components involved. To withdraw the centerboard slot from underneath, press the pivoting pin assembly together and withdraw the centerboard down. To replace, insert the pivoting pin assembly in the hole in the centerboard, compress it to the thickness of the centerboard case, and insert the whole unit up into the centerboard case, having first established where the pivoting pin locates. The pin assembly will expand when it reaches its location point and the centerboard is ready for operation. The pivoting centerboard is already fitted to the boat. Should you need to take it out, first check the detail arrangement the drawing REFER TO DETAIL 12. This will show you the components involved. To withdraw the centerboard slot from underneath, press the pivoting pin assembly together and withdraw the centerboard down. To replace, insert the pivoting pin assembly in the hole in the centerboard, compress it to the thickness of the centerboard case, and insert the whole unit up into the centerboard case, having first established where the pivoting pin locates. The pin assembly will expand when it reaches its location point and the centerboard is ready for operation. RIGGING PROCEDURE
 Start, first of all, with the mast. Beginning from the top, take the main halyard, which is 3/16″ line, and one shackle, and with a bowline knot, tie the shackle onto one end of the main halyard. Then, tie a figure eight knot in the halyard at a point 9″ from this shackle. Take the free end of the halyard and pass it through the fitting at the top of the mast, from the back (grooved side of the mast) through the fitting at the top of the mast, and down again, on the front side of the mast through the small fitting (halyard lock) which is mounted a short distance from the top of the mast (the chromium plated or polished fitting with a hole in it), and pull it right down to the bottom of the mast. Just for convenience, you should take both ends of the halyard to the bottom of the mast and attach them to the cleat; this will keep them out of the way before the mast is stepped (raised). REFER TO DETAIL 2. Start, first of all, with the mast. Beginning from the top, take the main halyard, which is 3/16″ line, and one shackle, and with a bowline knot, tie the shackle onto one end of the main halyard. Then, tie a figure eight knot in the halyard at a point 9″ from this shackle. Take the free end of the halyard and pass it through the fitting at the top of the mast, from the back (grooved side of the mast) through the fitting at the top of the mast, and down again, on the front side of the mast through the small fitting (halyard lock) which is mounted a short distance from the top of the mast (the chromium plated or polished fitting with a hole in it), and pull it right down to the bottom of the mast. Just for convenience, you should take both ends of the halyard to the bottom of the mast and attach them to the cleat; this will keep them out of the way before the mast is stepped (raised). REFER TO DETAIL 2.  Next, take the shrouds, that is, the two coils of wire that are similar (the other coil of wire, which is flexible, is the forestay). Take the pair of pliers and proceed to the point on the mast where there are three tangs sticking out, and with your pliers gently bend the tangs away from the mast so they are approximately one inch from the mast so that you can get the female fitting on the shrouds into them more easily. Undo the coiled up shrouds and fix the female fittings to the tangs on either side of the mast. Using the screwdriver, make sure that you open out each cotter pin so that it does not come undone (don’t forget to do both sides). REFER TO DETAIL 3. Next, take the shrouds, that is, the two coils of wire that are similar (the other coil of wire, which is flexible, is the forestay). Take the pair of pliers and proceed to the point on the mast where there are three tangs sticking out, and with your pliers gently bend the tangs away from the mast so they are approximately one inch from the mast so that you can get the female fitting on the shrouds into them more easily. Undo the coiled up shrouds and fix the female fittings to the tangs on either side of the mast. Using the screwdriver, make sure that you open out each cotter pin so that it does not come undone (don’t forget to do both sides). REFER TO DETAIL 3.
 ROLLER REEFING GEAR ROLLER REEFING GEAR
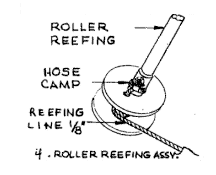
Start off by taking one of the hose clamps and thread it on one end of the plastic tube assembly and slide it all the way to the bottom (that’s the end with the two white plastic flanges). Now, take the jib or small sail, unroll it and fit it onto the plastic and aluminum roller reefing tube assembly. Before passing the pocket or sleeve of the jib over the aluminum tube, it is advisable to check to see if there are any smallburrs which might tear the sail. If there are any, they should be scraped off with a fine file or knife. Having put the sail on, roll it up around itself, and when you finish, tie a clove hitch knot around it using one of the short lines provided, to keep it neat. REFER TO DETAIL 4.
NOW, ATTACH THE ROLLER REEFING UNIT TO THE MAST. Take the other hose clamp and pass it over the top part of the rolled sail and secure it, using the ordinary screwdriver, with the top of the sail approximately four inches from the top of the plastic tube. The bottom hose clamp is left loose at the present time. Now, take the flexible wire forestay and put the male end fitting in the end of the aluminum tube which has the slots and hole in it (in other words, the opposite end to the nylon flanges) and pass the wire forestay all the way through it. You are now left with the female fitting, that is the fork end, at the top. (That is the same end as that of the aluminum tube with the hole going through and the slot in it). Now get the 1″ clevis pin and pass this through the aluminum tube, forestay fitting and the tang. Finally, put the cotter pin through the hole in the end of the clevis pin and open up the ends of the cotter pin with your screwdriver so that it does not come loose. REFER TO DETAIL 3.  Next, take the two plastic tubes, which came out of the miscellaneous fittings package, and pass them on to the shrouds (that is, the two wires coming down from the tangs or hound fitting). Attach one of the chain adjuster plate fittings (the 6″ “U” shaped plates with holes down both sides) onto each end. Connect the wire shroud into the fittings at approximately the seventh hole down. REFER TO DETAIL 5. Next, take the two plastic tubes, which came out of the miscellaneous fittings package, and pass them on to the shrouds (that is, the two wires coming down from the tangs or hound fitting). Attach one of the chain adjuster plate fittings (the 6″ “U” shaped plates with holes down both sides) onto each end. Connect the wire shroud into the fittings at approximately the seventh hole down. REFER TO DETAIL 5.
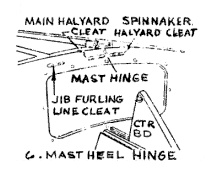 Then, is sequence, place the mast on top of the boat and connect the hinge fitting at its base (heel) with the fittings on the deck. Attach the shrouds and shroud adjusting fittings to the chain plates, which come out of the boat. Next, take the flexible forestay, the male fitting end, and go to the front end of the boat. There you will find there are 2 lead lines coming out of the holes in the deck. Take the 3/32″ forward one of these, that is through the largest hole, and attach the lead line from it to the forestay fitting, making sure there is rather a large loop before you tie a bowline knot. Then, is sequence, place the mast on top of the boat and connect the hinge fitting at its base (heel) with the fittings on the deck. Attach the shrouds and shroud adjusting fittings to the chain plates, which come out of the boat. Next, take the flexible forestay, the male fitting end, and go to the front end of the boat. There you will find there are 2 lead lines coming out of the holes in the deck. Take the 3/32″ forward one of these, that is through the largest hole, and attach the lead line from it to the forestay fitting, making sure there is rather a large loop before you tie a bowline knot.  Pull the lead line, which in turn pulls the wire forestay through the hole in the deck. It passes through the pulley or block which is attached to the stem in the forward part of the boat and comes back to the lever adjustment fitting, which is on the right-hand side of the mast, inside the access hole to the foredeck. REFER TO DETAIL 6 & 7. Pull the lead line, which in turn pulls the wire forestay through the hole in the deck. It passes through the pulley or block which is attached to the stem in the forward part of the boat and comes back to the lever adjustment fitting, which is on the right-hand side of the mast, inside the access hole to the foredeck. REFER TO DETAIL 6 & 7.
NOW YOU ARE READY TO RAISE THE MAST Ideally, this should be done with two people – one person in the boat and the other person outside. Start with the person holding the mast outside the boat and walking it up, passing it over to the person inside the boat, to continue the maneuver. The person outside the boat then goes forward and takes hold of the forestay assembly and roller reefing gear. The person in the boat completes his maneuver of pushing the mast to the upright position, making sure that the shrouds are not fouling any part of the boat while he is completing this maneuver.
The person inside the boat remains holding the mast while the other person outside the boat should be steadying the mast by holding the forestay assembly and roller reefing gear. The person in the boat now takes hold of the 3/32″ lead line, (this is found looking into the access hole to the foredeck and should be attached to the lever adjustment fitting), and pulls the forestay through into the boat, while the second person outside the boat, guides the forestay into the hole and then when it is through, the aluminum tube as well. Now attach the male end fitting of the forestay into the lever adjustment fitting. 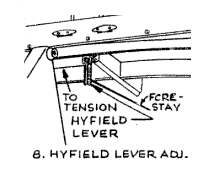 You will find there is a clevis pin already through this fitting and you should attach the male terminal fitting on the forestay to the hole adjustment point approximately five holes from the pivoting point of the fitting, putting the clevis pin in to retain it in that position. Secure the clevis pin by inserting a cotter pin and don’t forget to open out the ends of the cotter pin, and tension up the forestay by moving the lever to the rear of the boat. You should note that it is preferable to retain the lead line attached to the lever fitting so that you can use it to move the lever. You also have the line retained for when you want to lower your mast, in which case the above procedure is then carried out in the reverse manner. REFER TO DETAIL 8. You will find there is a clevis pin already through this fitting and you should attach the male terminal fitting on the forestay to the hole adjustment point approximately five holes from the pivoting point of the fitting, putting the clevis pin in to retain it in that position. Secure the clevis pin by inserting a cotter pin and don’t forget to open out the ends of the cotter pin, and tension up the forestay by moving the lever to the rear of the boat. You should note that it is preferable to retain the lead line attached to the lever fitting so that you can use it to move the lever. You also have the line retained for when you want to lower your mast, in which case the above procedure is then carried out in the reverse manner. REFER TO DETAIL 8. ATTACHING THE ROLLER REEFING LINE
You will find that the 1/8″ roller reefing line is already in position in the boat – one end being attached to the cleat which is fitted on the aft face of the foreword bulkhead, the other end coming out of the small hole in the foredeck and being attached to the other lead line. (A small point that you should notice, here, is that it is preferable when disconnecting the lead lines to tie a figure eight knot in the ends of the reefing line coming out of the rear of the two holes in the deck, and pass it twice around the white plastic flange fitting at the base of the roller reefing assembly, and then up through the hole in the upper flange through inside the hose clamp which is over the bottom of the sail, and tie a figure eight knot in the end of it. Using the ordinary screwdriver, tighten up the hose clamp, having first pulled down the pocket or sleeve of the jib sail to eliminate any wrinkles. The reefing gear is now secure and ready for operation. REFER TO DETAIL 4. Now take the rope jib sheet (the second largest coil of 3/8″ rope) and pass it through the clew or the jib sail, half the length of rope end to end, and with two knots (two half hitches), tie the rope to the sail at the central point. Then, take each end of the jib sheet and pass it through the jib sheet fairleads going inside the shrouds on the way. Some people prefer the jib sheets inside, some outside. When using the jib haulers, the sheets obviously have to be on the inside. Don’t forget to put a figure eight knot in the end of the sheets! REFER TO GENERAL ARRANGEMENT DRAWINGS AT RIGHT.  Next, take the boom and insert the gooseneck fitting in the opening in the mast provided, and slide it down the slot. Now, take the main sheet (the largest coil of 3/8″ rope), uncoil it and start threading it through the main sheet jammer cleat fitting, underneath the pulley, up around the pulley on the boom, (the one which is furthermost away from the mast), pass it through the pulley going towards the mast and come back down to the pulley fitting which is attached to the end of the centerboard trunk. Pass it through under the pulley, once again, towards the mast, now come up once again, to the pulley on the boom which is nearest the mast, and pass it through going toward the rear of the boat, and then down, again, to the top of the pulley fitting (the beckett), which is mounted on the rear of the centerboard trunk, and attach it with a bowline knot. Finish up by putting a figure eight knot in the other end of the main sheet! REFER TO DETAIL 9. Next, take the boom and insert the gooseneck fitting in the opening in the mast provided, and slide it down the slot. Now, take the main sheet (the largest coil of 3/8″ rope), uncoil it and start threading it through the main sheet jammer cleat fitting, underneath the pulley, up around the pulley on the boom, (the one which is furthermost away from the mast), pass it through the pulley going towards the mast and come back down to the pulley fitting which is attached to the end of the centerboard trunk. Pass it through under the pulley, once again, towards the mast, now come up once again, to the pulley on the boom which is nearest the mast, and pass it through going toward the rear of the boat, and then down, again, to the top of the pulley fitting (the beckett), which is mounted on the rear of the centerboard trunk, and attach it with a bowline knot. Finish up by putting a figure eight knot in the other end of the main sheet! REFER TO DETAIL 9.
You should adjust the angle of the main sheet jammer fitting so that if you took the line from the pulley through the jammer, you would just clear the side deck on either side. This gives you the correct angle. You then tighten up the center spindle with your 7/16″ wrench. YOU ARE NOW READY TO PUT THE MAIN SAIL UP First, put all the battens in the sail, starting with the long top one. This batten is what is called a shaping batten, which means it holds the contour of the sail to a per-set shape, which is determined by how you tension the batten into the pocket. You should insure that the angled end of the batten is inserted the correct way so that the angle of the batten end fits the angle of the end of the pocket. Next, insert the other three battens. These battens are of a different type and they are merely to stiffen the trailing edge of the sail. You will find that there are two short ones and one longer one, the longest one being in between the other two. To insert them, you merely put them into the pocket and push against the elastic, which you will find mounted in the inner end of the pocket. Push against it and allow the other end to slip back into the pocket. You are now ready to put the sail into the boom. Pull the bolt rope of the sail into the grove on the boom and pull it along towards the outward end of the boom, that is towards the rear or stern of the boat. Fasten the sail to the boom at the tack point with the pin provided, pushing the pin through the grommet in the sail and twisting it to secure it in position. Now, fit the clew out haul, attaching one of the pieces of 3/16″ line to the sail, using a bowline knot, then passing it through the grommet in the sail. Go back and forward a few times to take up the slack and tie off the line, using two half hitches around itself. REFER TO GENERAL ARRENGEMENT DRAWINGS AT RIGHT. You are now ready to raise the main sail. Take the main halyard and attach it by means of the shackle to the top or head of the main sail. Put the bolt rope or leading edge of this main sail into the grove of the mast and pull the main halyard down, with one person guiding the sail into the mast and up the sail goes. Keep on pulling, and if you look up, you will see that the knot in the halyard has appeared out of the mast head fitting at the top of the mast and is now in front of the mast, coming down again. You then move the halyard towards the bow of the boat and let the halyard go back up the mast again, slightly. The knot will then jam into the mast lock, which you can check by tensioning the sail down. Take the other end of the halyard and attach it loosely to the cleat at the base of the mast so that it can be taken off again easily. Then, take the last piece of 3/16″ line that you have left, which is the tack down haul, and attach it to the ring underneath the gooseneck fitting with a bowline knot. Pass the other end of the line down around a cleat which is just below it mounted on the after side of the mast, (It is sometimes possible that you may need to readjust the position of this cleat, which you can do, using your Phillips screwdriver); pass the down haul around the cleat, once, up through the ring again and finish off with the inevitable two half hitches around the rope itself. REFER TO DETAIL 2.  The next step is putting the rudder on, which is quite a simple operation. The male fitting (pintles) go into the female fittings (gudgeons), but you must remember to turn the lock which stops the rudder from coming off should you capsize. Notice that on your rudder, you have two lines attached to the tiller section. One of these lines is for pulling the rudder blade down, and the other to pull it up. REFER TO DETAIL 11. The next step is putting the rudder on, which is quite a simple operation. The male fitting (pintles) go into the female fittings (gudgeons), but you must remember to turn the lock which stops the rudder from coming off should you capsize. Notice that on your rudder, you have two lines attached to the tiller section. One of these lines is for pulling the rudder blade down, and the other to pull it up. REFER TO DETAIL 11.
The boat is now ready for sailing. SAFETY FACTORS 1. You will notice that a B. I. A. certified plate is fitted to your boat. This plate gives the designed weight carrying capacity of the boat. DO NOT OVERLOAD, IT COULD BE DANGEROUS. 2. Always be sure to have enough life jackets for everyone before you go out. 3. Don’t forget to take a paddle, anchor, flashlight and line with you, just in case the wind decides to leave you! 4. If you carry an outboard motor, don’t forget the fuel! 5. In the event of capsizing, it is important that everyone stays with the boat (that’s the Golden Rule). In normal conditions, when the water condition is reasonably calm, two or three people should not experience any problems staying on the boat and uprighting it. But, if you are carrying four to six people on the boat and it capsizes, then it is suggested that you all get off the boat by standing on the centerboard and pulling it upright, with the rest of the crew/passengers holding onto either the forestay or rudder until the boat is righted. If the weather is rough, it is important you insure that the plastic cover over the access hole in the foredeck is fastened before you go out sailing. Having this cover on position prevents any water that you might have in the cockpit surging forward into the forward section. While the bailers will, in time, suck the cockpit area dry of water, if you get any water in the forward section, then following draining the cockpit of excess water, you should remove the two drain plugs in the aft end of the centerboard trunk. The water will then flow from inside the boat, directly out the bailers. 6. If the boat fills with water as a result of people on it not getting off quickly enough or due to being in very wavy conditions, or damage due to collision, then you should first, upright it, and then lower the mail sail. The flotation, which is fitted as standard, will keep six people and the boat afloat so that there is no reason for alarm, as the boat will not sink, entirely. You should then reef the jib and head for safety utilizing as much of the area of the jib as you can handle at that time. 7. Should you be caught out on the water with the wind increasing to the point where you are uncertain of your ability or for the safety of the occupants in the boat, then you should reduce sail. As an initial step, you can reduce the area of the jib by reefing it up completely, by pulling the roller reefing line and cleating it. If the wind continues to increase, and you feel apprehensive, you should drop the main sail entirely, and secure it loosely along the boom with the mainsheet. You then roll out the jib sail completely, or reef it up until you feel that you have everything under control. When coming alongside a dock, another boat, a buoy, or picking up somebody from the water, you should consider rolling up the jib sail, as this reduces the crew involvement in sailing your boat, on the one hand, and enables you to see a lot better, on the other. 8. When sailing into the wind trim the jib in tightly and sail as upright as possible, allowing the mainsail to spill wind and “luff” as necessary to enable you to sail near upright. 9. Have a pleasant sail, relax, and enjoy the quiet way of life. If you are racing, the best of luck. |


